 |
|
|
|
| |
Replication Module Online Help
 | Simple Replication Module
|
| Custom Conditions
|
| Appendix
|
A 'Simple' Replication Module
------------------------------------------------------------------
Requirements for Using this Tool
| 1. For development and working with the supplied project source, you will need IB Objects version 4.x or higher.
|
| 2. Whether you are using the compiled version of the tool or the source, you will need the special UDF library BlobCompare. Instructions for obtaining and installing this library for Windows and Linux servers are in the Appendix.
|
| Note also that Novell servers do not support UDFs.
|
The tool is mainly to demonstrate one of two specialized IB Objects components which have been developed to enable replication from one database to another. However, you can use this tool as a convenient "desktop" in which to set up and experiment with IBO replication.
Currently, replication is "one-way", that is, it will replicate DML changes from tables in the source database to tables in the target database according to the rules you set up for it. Two-way replication is possible in a future revision.
I call this a simple replication module but it does allow quite a large degree of flexibility.
| · | You don't have to replicate every column. Limiting both the rows and the columns to be replicated is straightforward.
|
| · | It gracefully handles key changes.
|
| · | Changes can be queued for performing row-by-row replication during idle CPU time on the server.
|
| · | A full resync can be done with or without queuing.
|
The tool is "simple" insofar as it currently does not attempt to alter any metadata other than those it creates itself for implementing replication. It is assumed that the developer will do any necessary setting up in the target database to accommodate the impact of the changes and the initial loading. For example, you may need to run a one-time or regular script to de-activate indexes and triggers at load-time or during full resyncs.
Automating some of the really tricky stuff, to make your replication strategy generic across all of your databases, is your job, as the programmer. All of the functionality you need for implementing your automation plan is available via components. You are assisted by a useful macro engine for handling parameters and chunks of sometimes complex code in generic ways.
Think of the tool you are using merely as a sample application written using the components. The application's form has only about 500-600 lines of code. The rest is encapsulated in the components.
Replication rules are stored in the target database
Storing the replication rules in the replication (target) database makes the programming task concise and portable. A system table in the target database stores the replication index definitions, names of source and target tables, key definitions and miscellaneous other information. A difference (DIFF) table is also maintained there for logging changes.
Queuing
Having stored procedures for sending and receiving replication notifications does not mean that databases have to be on-line all the time. The source-side procedures log DML changes ("replication actions") into a queue table in the source database. Records wait there until your service application processes them into the target database. This "item-by-item" resynchronization is the normal mode of replication.
Full (Re)synchronization
Full (re)synchronization of the target database with the source is an occasional requirement. It occurs at initial loading and periodically afterwards for housekeeping and verification. A full resync does not use the data in the queue table but reconciles the current state of the source data with that of the target.
Blobs and Arrays
The queue table carries flags which will cause a BLOB column to be ignored in a queue resync if no changes have impacted it. By this means, item-by-item replication of rows will not pass an unchanged blob over to the target database.
A full resync screens blobs on the source and target sides and passes blob data across only if a segment-by-segment compare indicates a change.
Arrays currently cannot be replicated with this tool.
Components
IBO supports this style of replication with two components.
|  TIB_RPL_Sync does the work of queuing the changes from the source database and synchronizing the two databases. As mentioned previously, in its simple form, IBO replication only synchronizes the target using input from the source. There is already keen interest in making it work both ways. TIB_RPL_Sync does the work of queuing the changes from the source database and synchronizing the two databases. As mentioned previously, in its simple form, IBO replication only synchronizes the target using input from the source. There is already keen interest in making it work both ways.
|
|  TIB_RPL_Meta, a descendant of TIB_RPL_Sync, encapsulates the creation and management of metadata in the target database, drawing on metadata attributes from the source database. TIB_RPL_Meta, a descendant of TIB_RPL_Sync, encapsulates the creation and management of metadata in the target database, drawing on metadata attributes from the source database.
|
Notifications Between Databases
Stored procedures are used on both source and target to send and receive replication notifications. Because notifications can be both item-by-item and in a mode that effects a full resynchronization, there are four procedures altogether.
Think of this system as having two data pipelines between source and target. One pipeline is for a full resync. The other is for item-by-item synchronization from a queue. Both are bottled up into the TIB_RPL_Sync component.
The initial set-up checks for any data already in the target table(s). If not, it populates the table(s) directly using INSERT statements. If data is already there, it simply does a full resync.
Unlike some other replication models, where every table logs to another table with column-level entries for every change that occurs, and later "walks the entries" to eliminate all but the most recent for each changed row, this model logs only the old and new key values.
At sync time, like the data-logging model, it begins by eliminating unhandled inserts and edits from the queue. Then, instead of using logged data to construct DML statements for the target database, it uses the latest logged key to query the most recent version of the source directly. As well as guaranteeing snapshot synchronization, this strategy deals very elegantly with BLOB and ARRAY data which are problemmatical for the data-logging model.
A full resync causes changed rows to be logged to the DIFF table. After a full resync has been done, the new DIFF rows can be inspected. Item-by-item syncs are not logged.
Replication is not duplication
While mirroring is possible, it is not usually necessary. It is possible to main fully customized data structures on the target because stored procedures are performing the DML on both sides. The source can be limited to only a subset of and/or a subset of columns.
About This Module
This application provides a working demo implementing the IBO replication components. It will be useful also as a tool for setting up replication, possibly as a starting point for your own, more sophisticated service application.
It provides the means to supply the source and target databases each with its own connection. Each connection has its own utility bar, bringing many of the common IBO utilities to the tool's desktop, including the scripting tool and the new TIB_DDL_Extract component to make it simple to duplicate the source metadata in a new target database.
Bomb-proofing
Because the accuracy and timeliness of replication are crucial, your service application should incorporate plenty of bomb-proofing. This particular service application handles connections that are temporarily lost. All replication actions are performed within a single, two-phase commit transaction spanning both databases, making it is a very secure model.
As you will discover, the tool steps you through the tasks in a logical order, enabling each step upon successful completion of the previous one.
Following are the basic steps for configuring one table in one source database for a simple replication service. Trace through these steps one at a time to begin with, to have the module do its default, automatic stuff.
1 - Prepare the Source and Target Databases
The Source Database
It is recommended that you practise first using a copy of your database, to make it easy to bury your mistakes and start afresh! This tool favors the situation where you want to create the destination tables at setup and configuration time. In theory, replication with already populated target tables should work. It has been tested to some degree already but it has not been drilled really hard.
| IMPORTANT :: An essential preliminary step is to add the library containing the User-Defined Function (UDF) FN_BLOBS_EQUAL to your database. Please refer to the Appendix for details of how to get and install this library and declare it to the database.
| |
The Target Database
Before you start, create the new, empty replication target database.
Connecting
When you are ready, connect to the two databases.
If your source database uses UDFs and/or domains, you can use its Extract tool to get these pieces from its metadata and paste them into the Script Editor window of the target database. Execute the script and commit it and you are ready to start with replication.
With both databases "in line", you can proceed to create and load the new system table: click the  button. button.
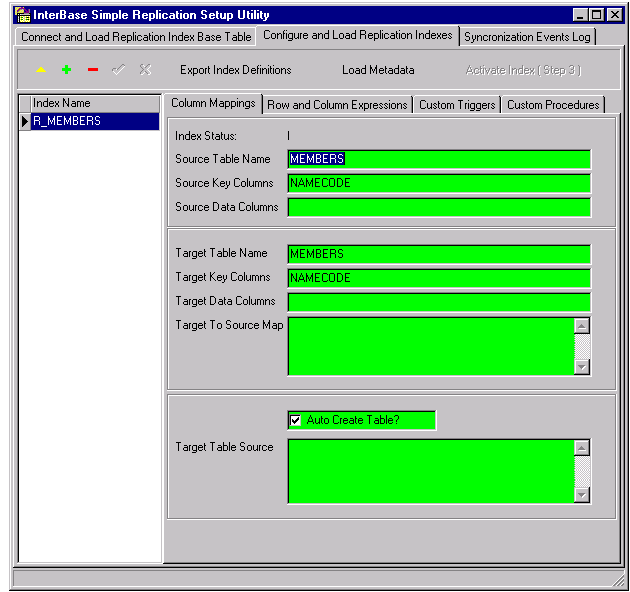
Step 2 - Configuring and Loading Indexes for Replication
The configuration page appears:
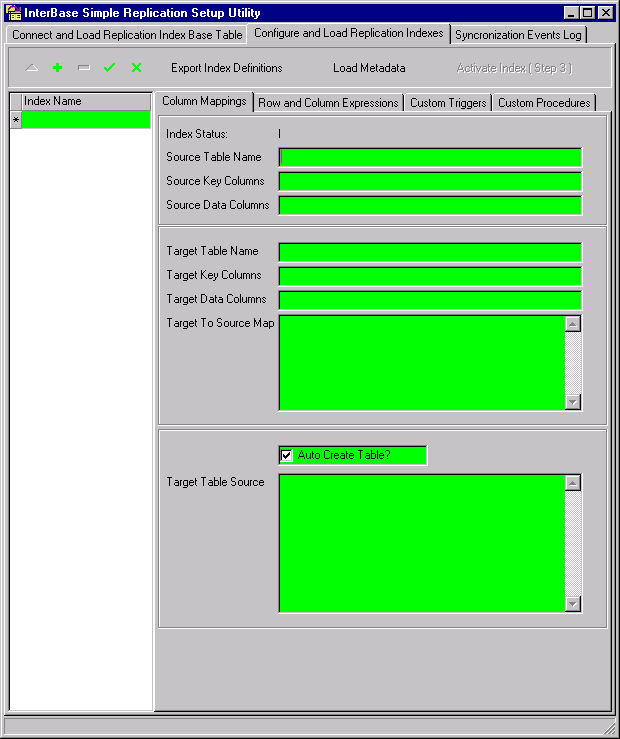
To start simply, focus on the index data entry panel at the left and the top panel of the configuration display. You can ignore the other panels (expressions, etc.) for the time being. They are for refining either rows or columns.
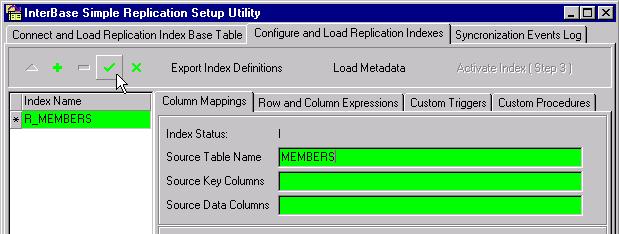
Add an index name for one table in your source database and type in the source table name.
The name you enter in this field is tokenized as <<SRC_TBL_NME>>.
The purpose of the Create Table flag is to have the application recognize objects it has created itself, for use later in case metadata are to be dropped. Leave it checked, unless the destination table already exists in the target.
Click the Post button...
Observe that the tool has populated the other three fields:
| Source Key Columns is a comma-separated list of the columns that form the primary key of the source table. It is tokenized as <<SRC_KEY_CLS>>.
| |
| Target Table Name is the name that will be given to the replication table in the target database if Create Table was checked True. It is tokenized as <<DST_TBL_NME>>.
| |
| Target Key Columns is a comma-separated list of the columns that form, or will form, the primary key of the target table. It is tokenized as <<DST_KEY_CLS>>.
| |
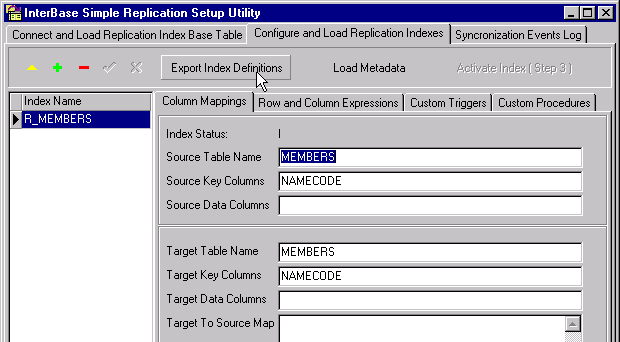
3 - Load the Metadata
Now, to load the metadata for this table, click the  button... button...
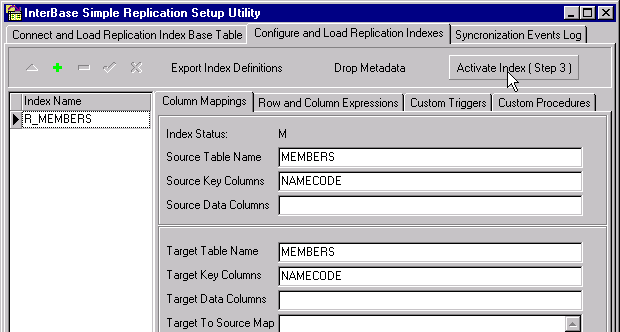
4 - Activate the Index
Now, just click the next button to activate the index and it is done.
As you define a replication index, various domains, tables, triggers, stored procedures and generators are created. They all start with the
prefix RPL$ to distinguish them from your own metadata objects. (The Browser of the IB_WISQL tool gives you the option to filter them out..).
Note that metadata are not replicated. Just data.
On the Target Side
A full sync is done initially, while configuring your replication strategy and getting the tactics set up. It takes some time to complete. In production, you would only do a full sync as a housekeeping chore, when you want to verify the consistency of the data across both databases.
On the target table, a system column (RPL$SYNC_ID) has been included in the table structure, for recording the serial number of a full resync. A new serial number is generated each time a full resync starts and target rows which are updated by the resync get "stamped" with this new serial number. On completion, any rows remaining in the target table with a Sync_ID lower than the new serial number will get deleted (unless another rule exists determining that such rows must be retained (see Custom Conditions: Conditions for Deletion).
On the Source Side
The Queue
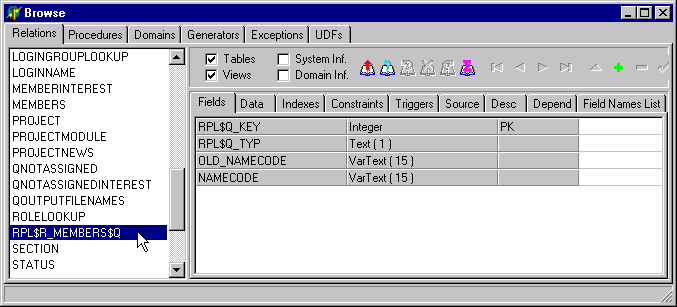
The source-side procedures log replication actions into a queue table (RPL$R_MEMBERS$Q in the case of this particular table). Records wait there until your service application processes them into the target database.
Macro Processing
This tool introduces an effective macro processing engine to reduce the amount of construction you have to do on a table-by-table basis. A non-definitive list of macros appears near the end of this document.
You have plugged in all the parameters. Pushing the button caused the components to execute all of the necessary DDL statements to create tables, triggers, procedures, generators, etc.
Once those were all in place, pushing  populated them with data. Once this population and activation step has taken place, replication will occur if you are using either the TIB_RPL_Sync or TIB_RPL_Meta component. (Once everything is configured, your client service app won't need the extra overhead of TIB_RPL_Meta). populated them with data. Once this population and activation step has taken place, replication will occur if you are using either the TIB_RPL_Sync or TIB_RPL_Meta component. (Once everything is configured, your client service app won't need the extra overhead of TIB_RPL_Meta).
Use the Tools
Use the tools in this utility to watch what happens as you configure and test your replication indexes.
During your configuration steps, use the Browse dialogs  on the source and target panels to view the metadata and data as they are created. Keep the Sync Log (third tab) in view. on the source and target panels to view the metadata and data as they are created. Keep the Sync Log (third tab) in view.
It is worthwhile opening the SQL Monitor dialog  as well, to keep an eye on the statements that are being passed. as well, to keep an eye on the statements that are being passed.
As you make changes in the source and refresh the target you will be able to observe that it is indeed replicated.
Testing and Checking
Try making some changes in the replicated data in order to corrupt it. Then, try pushing the Resync Index button on the Sync Log tab. You will notice that the corruptions are corrected.
Notice that when a full resync is done, changes are recorded in the SYNC_DIFF table. Use the target's Browser dialog to look at the table RPL$SYNC_DIFF.
On the Sync Events Log tab and you can tell it to use event alerters or you can click a button to force it to check. It looks in the Q table on the source database for entries and processes them. As each item is processed the item in the Q is deleted. Everything is done in a single two-phase commit transaction, making things very secure.
The first time the data is loaded after the metadata is loaded, a check is done to see whether there is already data at the target.
| · | If there is no data, the target table will be directly populated from the source using an INSERT statement.
| |
| · | If the table has some data in it already, a standard total resync is done and all differences are logged in the DIFF table created on the target. This is where you can always look to see the changes that were needed when a total resync has been done..
| |
Full (Re)synchronization
The full resync after initial loading is done so that you can verify that nothing got corrupted in the replication process. For example, you may want to sample the target table's data to ensure that no data got changed or deleted unexpectedly or that no errors showed up in any custom processing you added.
The full resync uses a special column added to the target table called RPL$SYNC_ID. Its purpose is to serialize the synchronizations from a generator which is incremented each time a full resync starts.
It fetches the entire dataset from the source as it should be on the target. As each row comes from the source procedure it is executed through a procedure on the target side. If a row doesn't exist it is added and logged. If it does exist and there is a difference, it is updated and the old values are logged. The updated row is given the new Sync_id, even if it is the same.
Once it has gone through all the rows, it will delete and log each item whose sync_id was not updated to the new value that was generated when the sync process started. Those rows which have matches in the source dataset get the updated sync_id; those which don't get matched keep their old sync_id and get bumped out.
A faster approach to a full sync could have been done if it could have been guaranteed that both the source and the target datasets would have exactly the same ordering. Because I don't want replication to enforce restrictions that would not otherwise be necessary, I chose to compromise slightly on efficiency in favor of more flexibility. I justify this for InterBase/Firebird because its excellent transaction support will tend to make frequent full resyncing unnecessary.
Item-by-Item Synchronization
As changes take place in the source table, triggers fire that populate the queue table with notifications. A notification consists of an action type (insert, update or delete), a unique id for the queue item, as well as the old and new values of the key columns (because I wanted to allow for changes in key values).
When a notification is inserted into the queue table an event is triggered. The sync client, which is listening for those events, picks them up and processes the queue till it is empty.
The client does not fetch from the queue table directly. In order to provide plenty of options for building custom datasets to send to the target, it uses a SELECT procedure that derives an output set from on the queue table.
As you work through this document, you will see how powerful this approach can be in designing for the most complex replication requirements.
Custom Conditions
If your requirements necessitate setting special conditions to limit the columns or rows selected to exist, be updated and/or be retained in the target database, the replication engine allows plenty of flexibility.
Several more fields can be configured for more complex, customized situations where you want something more refined than simply duplicating rows and columns from the source table to the target table.
This configuration takes place on the tab labelled 'Configure and Load Replication Indexes', which becomes visible after pressing the button on the initial (Connection) tab. The fields concerned are distributed across a set of tabs within this page.
Macro Tokens
By now, you will have figured out that the entries in the configuration fields are really just snippets of SQL. They are tokenized as constants enclosed in double brackets, e.g. <<SRC_TBL_NME>>. As you will learn, these tokens can often be embedded inside other snippets. At various stages in the construction of DDL and DML by methods of the components, these tokens are passed to a macro engine. The engine - a dedicated parser routine - uses the corresponding snippets in the transformations that result in complete DDL scripts for objects and procedures or, at run-time, in SQL parameters for the procedures.
In the Appendix is the DDL that was generated by this module from the configurations demonstrated in the two sample topics (Replication Sample 1 and Sample 2).
TIP --> Use a Text Editor!
Obviously, entering complex expressions directly into these fields is not very convenient. It is recommended that you construct your entries to your satisfaction using your favourite text editor and simply paste them into the configuration fields. As this tool evolves, the interface will be made more usable.
This tab is found on the Configure and Load Replication Indexes page:
Source Data Columns
If you don't want to duplicate every column from the source table into the target table, enter an SQL SELECT statement without the SELECT keyword. GROUP BY and HAVING can be included if you want to aggregate into the target column. WHERE and ORDER BY keywords can not be included.
e.g.
| NameCode, FirstName||' '|| Surname AS ConcatName, DateOfBirth
|
Target Data Columns
If the output columns of the SELECT from the source table will not match the columns in the target table, name all of the target table columns here in a comma-separated list from left to right in the target table column order. The string should look like the column list portion of a CREATE TABLE statement, e.g.
| NameCode varchar(15), FullName varchar(45), BirthDate Timestamp
|
Target to Source Map
If there are entries in Source Data and Target Data, then map the corresponding columns with the Target table column names of the left, e.g.
Target Table Source - <<DST_TBL_SRC>>
If you want to limit the columns which are replicated from the source table, you can optionally supply the portion of the CREATE TABLE statement that defines the columns for the target table, into the Target Table Source (DST_TBL_SRC) field:

The syntax is the same as for defining the fields in a CREATE TABLE statement. For example, if you were doing a phone list and wanted just name and phone number you would do this in the field:
| LAST_NAME VARCHAR( 30 ) NOT NULL,
|
| FIRST_NAME VARCHAR( 30 ) NOT NULL,
|
This tab is found on the Configure and Load Replication Indexes page:
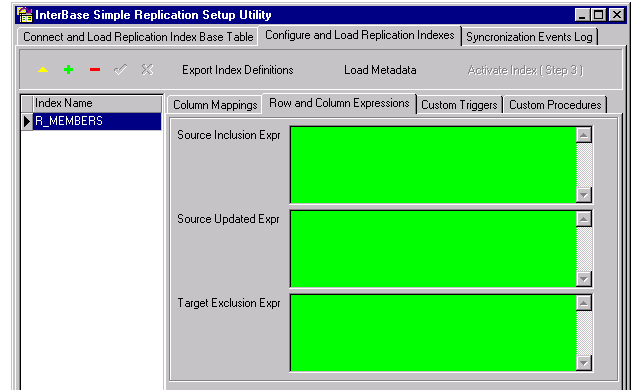
Source Inclusion Expression - <<SRC_ADD_EXP>>
The Source Inclusion Expression field (SRC_ADD_EXP) can be left blank if you want replication of all rows from the source database. For limiting replication to just certain rows, this field is where you put the expression that sets the restricting conditions for selecting those rows. The conditions must be true for a record to be moved to the target database.
For example, my customer has a database listing all trade names, whether active or inactive. We want to search only active registrations. These are replicated to a separate database so that the Full Text Search stuff can be put on it without bloating the original database. Thus there is a rule to only replicate active records.
To accomplish that, I put this into the Source Inclusion Expression field:
<<EXP>>NIR_STATUS = 'A'
When the <<EXP>> macro token is embedded before the SRC_ADD_EXPR snippet, it indicates that the macro expander engine is to swap in NEW. and OLD. as appropriate when generating the DDL for the trigger.
Refer to the Macro Substitutions topic for macro tokens that can be placed in other fields.
Source Updated Expression - <<SRC_UPD_EXP>>
To set up the conditions so that replication only happens if any of these columns changes, while changes to different columns will be ignored, supply an expression in the Source Updated Expr (SRC_UPD_EXP) field that detects only the relevant changes:
The following code excerpt, matching the syntax of the conditions within a WHERE clause, is pasted into the field:
| ( new.emp_no <> old.emp_no ) or
|
| ( new.last_name <> old.last_name ) or
|
| ( new.first_name <> old.first_name ) or
|
| ( new.phone <> old.phone ) or
|
| (( new.phone is null ) and ( old.phone is not null )) or
|
| (( new.phone is not null ) and ( old.phone is null ))
|
The effect of this snippet will be to exclude from the replication set all source rows that don't meet any of these conditions, even if there are changes in other columns.
Key Changes
Regardless of the update inclusion/exclusion condition, rows where key changes occur will always be included, unless they were subsequently deleted.
Target Exclusion Expression - <<DST_DEL_EXP>>
The default Delete behavior during replication is to delete target rows that match deletions in the source table. During a full resync, any target rows that have no corresponding source rows will be removed.
In some situations, you may want the non-matching rows retained. For example, you may have more than one source database writing to the same target.
To override this default deletion behavior, you can supply conditions to restrict the rows affected by this automatic deletion. The Target Exclusion Expr (DST_DEL_EXP) field is used:
To elucidate the concept of retaining rows because their persistence in the target database is required for some other purpose, the target table in the second example is a mix from two separate sources. An external stored procedure synchronizes another database with my target via a custom TCP/IP messaging protocol and maintains its records in the same target table.
A condition is set so that the WHERE clause of the DELETE statement will operate only on target rows that have a certain code value which is present in a reference table (NIR_TYP):
| WHERE nt.NIR_CODE = <<EXP>>NME_CODE )
|
The rows that "belong" to the other system are selected by an equivalent existence check on a different reference table:
| WHERE nt.NME_CODE = n.NME_CODE ))
|
This tab is found on the Configure and Load Replication Indexes page. Here is where you define the triggers for the source table that will cause rows to be added to the Send Queue.
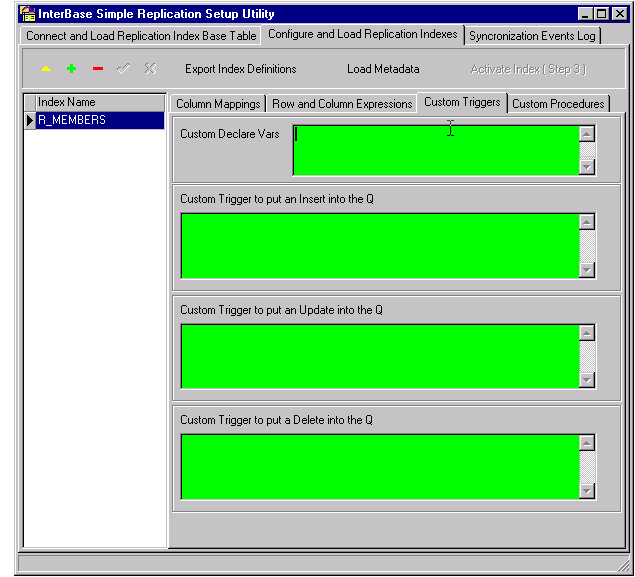
Custom Declare Vars
This is for declaring any custom variables that will be used in your triggers. The same variables will be used in all of the triggers.
Custom Trigger Code
Write triggers as usual. Macros tokens can be utilized wherever applicable. This will be particularly useful where trigger code for the different DML operations is very similar. You may wish to use macro tokens to make your set of triggers quite generic so that it can be reused for other tables.
Custom Variables and Procedures
This tab is found on the Configure and Load Replication Indexes page. Here is where you configure the stored procedures that will be generated in the source database to create the SQL streams for performing synchronization.

Here is where you can define procedures to perform any custom transformation, queueing and synching you need your replication service to do.
The first field (SRC_PRC_DEC_VAR) is for declaring any custom variables that will be wanted by your source-side procedures.

The same variables are available to both procedures. The syntax is the same as any DECLARE VARIABLE statement in a stored procedure, e.g. from Sample 1,
| DECLARE VARIABLE tmpLASTNAME VARCHAR( 60 );
|
| DECLARE VARIABLE tmpFIRSTNAME VARCHAR( 60 );
|
| DECLARE VARIABLE tmpMIDDLENAME VARCHAR( 60 );
|
The replication components can access and expand your declared source procedure variables through the macro <<SRC_PRC_DEC_VAR>>.
The next field (SRC_PRC_INIT_VAR) is for entering procedure language statements to initialize the source procedure variables:

Sample 1 has this statement to do that initialization:
The replication components can access your initialization statements through the macro <<SRC_PRC_INIT_VAR>>.
The 'Custom Send-Q Procedure' (SRC_PRC_Q_SRC) can be a simple or complex procedure chunk to perform data transformations, query other tables for parameters, whatever is needed for your custom SQL to process the send queue to select rows for replication and pass exactly the right replication across to the target.
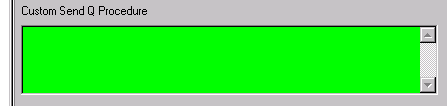
In this field you define the processing for one row to be replicated. At configuration time, you don't know the criteria for the item-by-item configuration, since it will depend on what is in the queue table. The template will take care of embedding it inside the appropriate FOR..SELECT loop for you so you should not include it in the procedure.
You can embed macros inside your procedures and make them sufficiently generic to apply to many of your replications without a lot of extra code. The custom send-queue procedure itself is tokenized as the macro <<SRC_PRC_Q_SRC>>.
This simple example from sample 1 shows a macro token embedded in a procedure chunk:
| FOR SELECT n.AGENT_ID, n.LASTNAME, n.FIRSTNAME, n.MIDDLENAME
|
The parser routine MacroSubstitute() takes the content of the token and replaces it with the value configured in the source table name field in the first panel.
Likewise, in the 'Custom Send Full Procedure' box you can define a simple or complex custom source-side selection procedure chunk for the full resync (SRC_PRC_SRC_FULL).
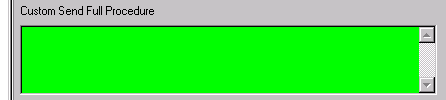
For this procedure chunk, you know what the conditions will be for a full selection and you need to include the enclosing FOR..SELECT..DO..SUSPEND loop in order to process the full table. This procedure is tokenized in the macro <<SRC_PRC_SRC_FULL>>.
Both of the following samples have examples of custom send-queue and full-resync selection procedures.
The following is the configuration of a replication index for an application I did for a customer.
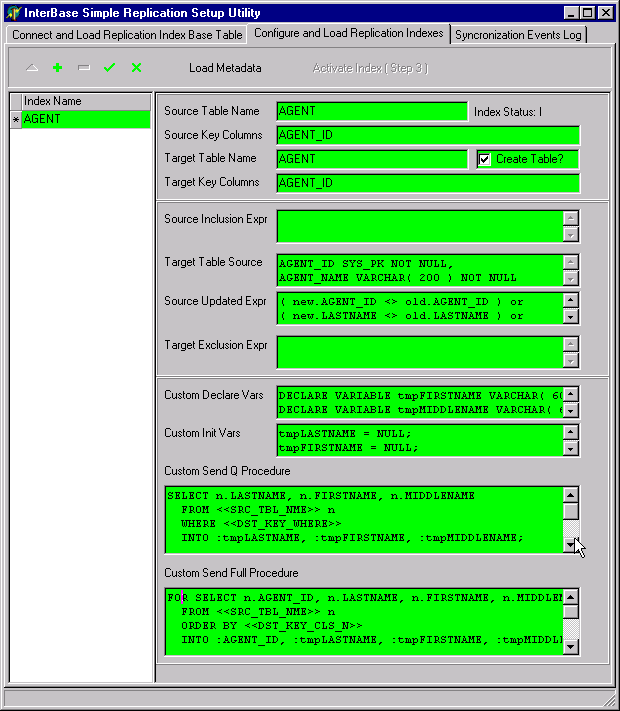
| Name of the replication index (IND_NME): AGENT
|
| Source table name (SRC_TBL_NME): AGENT
|
| Source table key column(s) (SRC_KEY_CLS): AGENT_ID
|
| Target table name (DST_TBL_NME): AGENT (to be created)
|
| Target key column (DST_KEY_CLS): AGENT_ID (to be created)
|
| Create Table flag (DST_TBL_CREATE): Check this true
|
| Checking the Create Table flag indicates that the target table was created along with the replication index. Flagging it False would prevent the table from being dropped if the replication index is dropped.
| |
| Target Table Source (DST_TBL_SRC):
|
| This is the column creation code for the target table, used to create columns in both the target and the DIFF tables. The syntax for these is identical to the column definition portion of a CREATE TABLE statement:
| |
| AGENT_ID SYS_PK NOT NULL,
|
| AGENT_NAME VARCHAR( 200 ) NOT NULL
|
| Source Updated Expression (SRC_UPD_EXP):
|
| I give the source table some logic to determine the conditions for replicating an updated row to the target. My requirements are to replicate only if an agent's name is altered in any way or if the primary key changes:
| |
| ( new.AGENT_ID <> old.AGENT_ID ) or
|
| ( new.LASTNAME <> old.LASTNAME ) or
|
| ( new.FIRSTNAME <> old.FIRSTNAME ) or
|
| ( new.MIDDLENAME <> old.MIDDLENAME )
|
| ...so, if the address is changed in the source table, the row won't be replicated.
| |
A Data Transformation
In the process of replicating data, you may want to perform transformations to the source data and store them differently in the target. Transformation happens in the source-side procedures.
| Custom Declare Vars (SRC_PRC_DEC_VAR):
|
| If I want some variables in the procedures, I declare them here. Instead of duplicating the three name columns from the source table, I want to make the agent's name a single column in the target. I declare some variables to use for the concatenation:
| |
| DECLARE VARIABLE tmpLASTNAME VARCHAR( 60 );
|
| DECLARE VARIABLE tmpFIRSTNAME VARCHAR( 60 );
|
| DECLARE VARIABLE tmpMIDDLENAME VARCHAR( 60 );
|
| I could do this directly in an SQL statement but, for demo purposes, I'm using variables.
| |
| Custom Init Vars (SRC_PRC_INIT_VAR):
|
| Initializing these custom variables for the procedures that will construct the record streams to send to the target:
| |
| Custom Send-Q Procedure (SRC_PRC_Q_SRC):
|
| Because AGENT_NAME in the target table has no corresponding column in the source table, it cannot be populated automatically. I need an explict procedure to populate it. The procedure constructs statement to extract the values for the variables from the source table using parameters (embedded in the <<DST_KEY_WHERE>> macro) from the queue table. For the send-q procedure, I omit the FOR...SELECT loop because the parser will include it for me:
| |
| SELECT n.LASTNAME, n.FIRSTNAME, n.MIDDLENAME
|
| INTO :tmpLASTNAME, :tmpFIRSTNAME, :tmpMIDDLENAME;
|
| AGENT_NAME = tmpLASTNAME || ' ' ||
|
| Custom Send Full Procedure (SRC_PRC_SRC_FULL):
|
| In the procedure to return the entire dataset to be replicated, I place this SELECT statement in a FOR...DO...SUSPEND loop:
| |
| FOR SELECT n.AGENT_ID, n.LASTNAME, n.FIRSTNAME, n.MIDDLENAME
|
| INTO :AGENT_ID, :tmpLASTNAME, :tmpFIRSTNAME, :tmpMIDDLENAME DO
|
| AGENT_NAME = tmpLASTNAME || ' ' ||
|
This is a definition for a case where there was already an existing target table. The target table surrogate key is not present in the source table. There is no place where you explicitly say which columns on the target are populated from the source table, so I flag it as a COMPUTED column in the ColumnAttributes property of the IB_Connection object on the first (connection) tab:
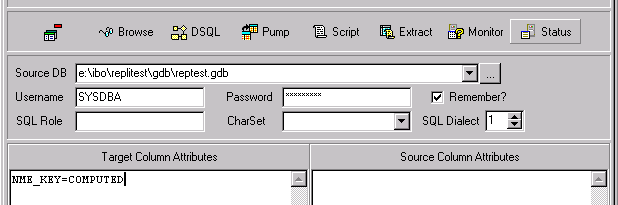
Columns flagged COMPUTED are ignored for inserts, updates and deletes, even if they are not in fact computed.
Here is the configuration tab all set up to load the metadata:

| Name of the replication index (IND_NME): NME
|
| Source table name (SRC_TBL_NME): NIR
|
| Source table key columns (SRC_KEY_CLS): FILE_ID, NIR_SUFFIX
|
| Target table name (DST_TBL_NME): NME
|
| Create Table flag (DST_TBL_CREATE): F (i.e. unchecked)
|
| A value of F(alse) here indicates that the target table already exists. Flagging it False prevents the table from being dropped if the replication index is dropped.
| |
| Target key columns (DST_KEY_CLS): NME_ID, NME_CODE
|
| These are the target columns which will be used to identify each replicated row uniquely.
| |
| DST_TBL_SRC is left blank because the table already exists.
| |
| Expression for adding a replication row, Source Inclusion Expr (SRC_ADD_EXP):
|
| SRC_ADD_EXP is an expression of the conditions used on the source to determine whether a replication row is to be inserted in response to a row being inserted in the source table. Notice that its syntax matches an element of a WHERE clause, similar to an SQLWhereItem in an IB_Dataset.
| |
| Expression for updating a replication row, Source Updated Expr (SRC_UPD_EXP):
|
| ( new.FILE_ID <> old.FILE_ID ) or
|
| ( new.NIR_SUFFIX <> old.NIR_SUFFIX ) or
|
| ( new.NIR_NAME <> old.NIR_NAME )
|
| SRC_UPD_EXP is an expression of the conditions used on the source to determine whether a replication row is to be updated in response to an update to the source table row. It is used in cases where only certain columns are being replicated so the others can be ignored.
| |
| Expression for deleting or retaining a replication row, Target Exclusion Expr (DST_DEL_EXP):
|
| WHERE nt.NIR_CODE = <<EXP>>NME_CODE )
|
| DST_DEL_EXP is an expression used on the target table to establish whether a row arrived into the table through replication or whether it came from another source unrelated to replication. Rows originating from other sources will be left alone when a full resync is performed. Otherwise, they would be deleted from the target table, since they have no matching records in the source table.
| |
The next sections are used to construct the data stream that is sent to the target database. One is for sending the records from the queue. The other is used to send all records for a full resync of the whole index.
| Variable for stored procedures, Custom Declare Vars (SRC_PRC_DEC_VAR):
|
| DECLARE VARIABLE tmpNIR_SUFFIX INTEGER;
|
| SRC_PRC_DEC_VAR declares a custom variable which will be placed in the two stored procedures.
| |
| Initial value for the custom variable, Custom Init Vars (SRC_PRC_INIT_VAR):
|
| SRC_PRC_INIT_VAR provides an initial value for the custom variable(s) defined by SRC_PRC_DEC_VAR, for both procedures.
| |
Procedure chunk (SRC_PRC_Q_SRC)
Here we define a procedure chunk to supply the values from the queue for the SQL stream that will be used to replicate the queue across to the target. Columns that have names in common between the source and the target have their names and values automatically filled in for you. You must supply names and values for any target columns that have no match on the source.
In the present example, except for the system columns from the queue table, there are no columns that match by name. It is up to this procedure to supply them.
The key from the queue table enables me to get at the old and new key columns that are logged into the queue table. From these I can get the rest of the information that I need to populate the replication row sent to the target.
It is possible to include fairly complex queries or transformations in the procedure chunk. In the present example, the source has a numerical code for SUFFIX but the target uses a character-based lookup. I use the SRC_PRC_Q_SRC chunk to do this transformation:
| WHERE nt.NIR_SUFFIX = q.NIR_SUFFIX )
|
| WHERE nt.NIR_SUFFIX = q.OLD_NIR_SUFFIX )
|
| WHERE q.RPL$Q_KEY = :RPL$Q_KEY
|
| INTO :NME_ID, :OLD_NME_ID
|
| , :NME_CODE, :OLD_NME_CODE
|
| WHERE n.FILE_ID = :NME_ID
|
| AND n.NIR_SUFFIX = :tmpNIR_SUFFIX
|
Use of Macros
IBO replication incorporates an extendable macro language for substituting the parameters and expressions you have configured into the procedures. In the excerpt from the procedure above:
| <<SRC_TBL_NAME>> is a macro token which will fetch the variable you configured earlier and fit it into the procedure in a syntactically-correct manner.
| |
Your procedure chunk for SRC_PRC_FULL_SRC needs to spell out the whole record selection loop. Therefore, you define the exact image of the dataset that needs to be replicated. You can use macros here to make the procedure generic.
You may find it convenient to write your selection loop in its full, expanded form first, in a text editor, before configuring the contents of the expression fields. Then, just copy and paste from your expanded procedure language to the parameter and expressions field and replace the copied block with the appropriate macro calls.
| WHERE nt.NIR_SUFFIX = n.NIR_SUFFIX )
|
| INTO :NME_ID, :NME_CODE, :NME_TXT DO
|
Target Exclusion Example
Actually, the target table in my example is a mix from two separate sources. I needed to change an external stored procedure that maintains other records in the same target table. Its function is to synchronize with another database via a custom messaging protocol written directly to TCP/IP.
Notice that its exclusion expression is the opposite of the one for the replication index discussed above:
| CREATE PROCEDURE NME_SYNC_DROP( SYNC_ID INTEGER )
|
| DECLARE VARIABLE tmpSYNC_ID INTEGER;
|
| DECLARE VARIABLE tmpNME_ID INTEGER;
|
| DECLARE VARIABLE tmpNME_CODE VARCHAR( 4 );
|
| DECLARE VARIABLE tmpNME_TXT VARCHAR( 300 );
|
| FOR SELECT n.RPL$SYNC_ID, n.NME_ID, n.NME_CODE, n.NME_TXT
|
| WHERE n.RPL$SYNC_ID < :SYNC_ID
|
| WHERE nt.NME_CODE = n.NME_CODE ))
|
| INTO :tmpSYNC_ID, :tmpNME_ID, :tmpNME_CODE, :tmpNME_TXT DO
|
| INSERT INTO RPL$NME$SYNC_DIFF (
|
| RPL$TYP_ID, RPL$ACT_ID, RPL$SYNC_ID, NME_ID, NME_CODE, NME_TXT )
|
| 'D', :SYNC_ID, :tmpSYNC_ID, :tmpNME_ID, :tmpNME_CODE, :tmpNME_TXT );
|
| WHERE n.NME_ID = :tmpNME_ID
|
| AND n.NME_CODE = :tmpNME_CODE;
|
For comparing BLOB columns before deciding whether to replicate them, the replication module needs a special UDF library to be installed on the server. It contains the function FN_BLOBS_EQUAL for comparing the contents of two blobs. Custom-written by Ann Harrison (IBPhoenix), it is available for both Windows and Linux servers.
Where to Get the Library
The compiled BlobCompare.dll (for Windows servers) and BlobCompare.so (for Linux) are included with this help kit. Registered IBO users can download kits containing the libraries and C source code from the normal Registration Site URL.
Where to Install the Library
Use a decompression utility such as WinZip extract the library from the archive. Where to place it depends on your version of InterBase.
For v. 5.x, copy the library to the ..\lib folder of your InterBase installation.
For v. 6.x and Firebird, copy it to the ..\udf folder.
Make sure the ib_util.dll is also present, in the ..\bin or ../bin folder.
How to Declare FN_BLOBS_EQUAL to Your Databases
Declare the UDF using this DDL snippet, via DSQL or a script:
| /* Returns 1 if two blobs are equal, 0 if not */
|
| DECLARE EXTERNAL FUNCTION FN_BLOBS_EQUAL
|
| ENTRY_POINT 'fn_blobs_equal'
|
| MODULE_NAME 'BlobCompare';
|
Remember to COMMIT it !!
You may even need to stop and start your database server.
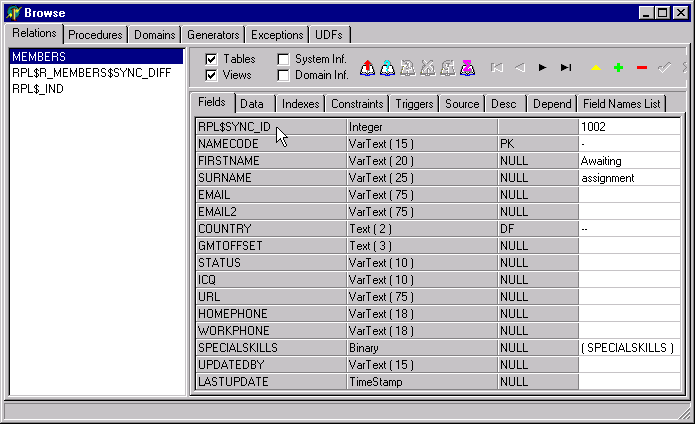
To test it interactively, e.g in the try it out on a blob column in any test table, for example:
| (select specialskills from members where namecode='SMITHJOH'),
|
| (select specialskills from members where namecode='JONESDAI')
|
Excerpt from the DDL script that was created from the configurations in Samples 1 and 2
...
CREATE TABLE RPL$NME$Q (
RPL$Q_KEY INTEGER NOT NULL
, RPL$Q_TYP CHAR( 1 ) NOT NULL
, OLD_FILE_ID INTEGER NOT NULL
, OLD_NIR_SUFFIX INTEGER NOT NULL
, FILE_ID INTEGER NOT NULL
, NIR_SUFFIX INTEGER NOT NULL
, CONSTRAINT RPL$NME$Q_PK
PRIMARY KEY ( RPL$Q_KEY )
)
CREATE TABLE RPL$AGENT_NAME$Q (
RPL$Q_KEY INTEGER NOT NULL
, RPL$Q_TYP CHAR( 1 ) NOT NULL
, OLD_AGENT_ID INTEGER NOT NULL
, AGENT_ID INTEGER NOT NULL
, CONSTRAINT RPL$AGENT_NAME$Q_PK
PRIMARY KEY ( RPL$Q_KEY )
)
CREATE TABLE RPL$AGENT$Q (
RPL$Q_KEY INTEGER NOT NULL
, RPL$Q_TYP CHAR( 1 ) NOT NULL
, OLD_AGENT_ID INTEGER NOT NULL
, AGENT_ID INTEGER NOT NULL
, CONSTRAINT RPL$AGENT$Q_PK
PRIMARY KEY ( RPL$Q_KEY )
)
CREATE TABLE AGENT (
AGENT_ID INTEGER NOT NULL
, LASTNAME VARCHAR( 60 ) NOT NULL
, FIRSTNAME VARCHAR( 60 ) NOT NULL /* Defaulted */
, MIDDLENAME VARCHAR( 60 ) NOT NULL /* Defaulted */
, ADDR1 VARCHAR( 60 ) NOT NULL
, ADDR2 VARCHAR( 60 ) NOT NULL /* Defaulted */
, CITY VARCHAR( 30 ) NOT NULL
, STATE VARCHAR( 2 ) NOT NULL
, ZIP VARCHAR( 10 ) NOT NULL
, PHONE VARCHAR( 13 )
, ADD_DATE DATE NOT NULL
, ADD_USER VARCHAR( 32 ) NOT NULL
, CHG_DATE DATE NOT NULL
, CHG_USER VARCHAR( 32 ) NOT NULL
, CONSTRAINT PK_AGENT
PRIMARY KEY ( AGENT_ID )
)
ALTER TRIGGER RPL$AGENT$Q_AD
AFTER DELETE
POSITION 0
AS
BEGIN
IF ( 1=1 ) THEN
INSERT INTO RPL$AGENT$Q(
RPL$Q_TYP, OLD_AGENT_ID
, AGENT_ID )
VALUES (
'D', OLD.AGENT_ID
, OLD.AGENT_ID );
END
ALTER TRIGGER RPL$AGENT$Q_AI
AFTER INSERT
POSITION 0
AS
BEGIN
IF ( 1=1 ) THEN
INSERT INTO RPL$AGENT$Q(
RPL$Q_TYP, OLD_AGENT_ID
, AGENT_ID )
VALUES (
'I', NEW.AGENT_ID
, NEW.AGENT_ID );
END
ALTER TRIGGER RPL$AGENT$Q_AU
AFTER UPDATE
POSITION 0
AS
BEGIN
IF ( 1=1 ) THEN
BEGIN
IF ( NOT ( 1=1 )) THEN
INSERT INTO RPL$AGENT$Q(
RPL$Q_TYP, OLD_AGENT_ID
, AGENT_ID )
VALUES (
'I', OLD.AGENT_ID
, NEW.AGENT_ID );
ELSE
IF ( ( new.AGENT_ID <> old.AGENT_ID ) or
( new.LASTNAME <> old.LASTNAME ) or
( new.FIRSTNAME <> old.FIRSTNAME ) or
( new.MIDDLENAME <> old.MIDDLENAME ) ) THEN
INSERT INTO RPL$AGENT$Q(
RPL$Q_TYP, OLD_AGENT_ID
, AGENT_ID )
VALUES (
'U', OLD.AGENT_ID
, NEW.AGENT_ID );
END
ELSE
IF ( 1=1 ) THEN
INSERT INTO RPL$AGENT$Q(
RPL$Q_TYP, OLD_AGENT_ID
, AGENT_ID )
VALUES (
'D', OLD.AGENT_ID
, NEW.AGENT_ID );
END
ALTER TRIGGER RPL$AGENT_NAME$Q_AD
AFTER DELETE
POSITION 0
AS
BEGIN
IF ( 1=1 ) THEN
INSERT INTO RPL$AGENT_NAME$Q(
RPL$Q_TYP, OLD_AGENT_ID
, AGENT_ID )
VALUES (
'D', OLD.AGENT_ID
, OLD.AGENT_ID );
END
ALTER TRIGGER RPL$AGENT_NAME$Q_AU
AFTER UPDATE
POSITION 0
AS
BEGIN
IF ( 1=1 ) THEN
BEGIN
IF ( NOT ( 1=1 )) THEN
INSERT INTO RPL$AGENT_NAME$Q(
RPL$Q_TYP, OLD_AGENT_ID
, AGENT_ID )
VALUES (
'I', OLD.AGENT_ID
, NEW.AGENT_ID );
ELSE
IF ( ( new.AGENT_ID <> old.AGENT_ID ) or
( new.LASTNAME <> old.LASTNAME ) or
( new.FIRSTNAME <> old.FIRSTNAME ) or
( new.MIDDLENAME <> old.MIDDLENAME ) ) THEN
INSERT INTO RPL$AGENT_NAME$Q(
RPL$Q_TYP, OLD_AGENT_ID
, AGENT_ID )
VALUES (
'U', OLD.AGENT_ID
, NEW.AGENT_ID );
END
ELSE
IF ( 1=1 ) THEN
INSERT INTO RPL$AGENT_NAME$Q(
RPL$Q_TYP, OLD_AGENT_ID
, AGENT_ID )
VALUES (
'D', OLD.AGENT_ID
, NEW.AGENT_ID );
END
CREATE TABLE NIR (
NIR_ID INTEGER NOT NULL
, FILE_ID INTEGER NOT NULL
, NIR_SUFFIX INTEGER NOT NULL
, NIR_STATUS CHAR( 1 ) NOT NULL /* Defaulted */
, NIR_NAME VARCHAR( 300 ) NOT NULL
, ADDR1 VARCHAR( 60 ) NOT NULL /* Defaulted */
, ADDR2 VARCHAR( 60 ) NOT NULL /* Defaulted */
, CITY VARCHAR( 30 ) NOT NULL /* Defaulted */
, STATE VARCHAR( 2 ) NOT NULL /* Defaulted */
, ZIP VARCHAR( 10 ) NOT NULL /* Defaulted */
, PHONE VARCHAR( 13 )
, BUSINESSTYPE VARCHAR( 60 )
, OWNER_TYPE VARCHAR( 16 )
, OWNER_FILE_ID VARCHAR( 30 )
, OWNER_FILE_TYPE VARCHAR( 30 )
, FOR_BEGINDATE DATE
, STATEOFORIGIN VARCHAR( 2 )
, DOM_BEGINDATE DATE
, ADD_DATE DATE NOT NULL
, ADD_USER VARCHAR( 32 ) NOT NULL
, CHG_DATE DATE NOT NULL
, CHG_USER VARCHAR( 32 ) NOT NULL
, REGISTEREDDATE DATE
, CONSTRAINT PK_NIR
PRIMARY KEY ( NIR_ID )
)
ALTER TRIGGER RPL$NME$Q_AD
AFTER DELETE
POSITION 0
AS
BEGIN
IF ( OLD.NIR_STATUS = 'A' ) THEN
INSERT INTO RPL$NME$Q(
RPL$Q_TYP, OLD_FILE_ID, OLD_NIR_SUFFIX
, FILE_ID, NIR_SUFFIX )
VALUES (
'D', OLD.FILE_ID, OLD.NIR_SUFFIX
, OLD.FILE_ID, OLD.NIR_SUFFIX );
END
ALTER TRIGGER RPL$NME$Q_AU
AFTER UPDATE
POSITION 0
AS
BEGIN
IF ( NEW.NIR_STATUS = 'A' ) THEN
BEGIN
IF ( NOT ( OLD.NIR_STATUS = 'A' )) THEN
INSERT INTO RPL$NME$Q(
RPL$Q_TYP, OLD_FILE_ID, OLD_NIR_SUFFIX
, FILE_ID, NIR_SUFFIX )
VALUES (
'I', OLD.FILE_ID, OLD.NIR_SUFFIX
, NEW.FILE_ID, NEW.NIR_SUFFIX );
ELSE
IF ( ( new.FILE_ID <> old.FILE_ID ) or
( new.NIR_SUFFIX <> old.NIR_SUFFIX ) or
( new.NIR_NAME <> old.NIR_NAME ) ) THEN
INSERT INTO RPL$NME$Q(
RPL$Q_TYP, OLD_FILE_ID, OLD_NIR_SUFFIX
, FILE_ID, NIR_SUFFIX )
VALUES (
'U', OLD.FILE_ID, OLD.NIR_SUFFIX
, NEW.FILE_ID, NEW.NIR_SUFFIX );
END
ELSE
IF ( OLD.NIR_STATUS = 'A' ) THEN
INSERT INTO RPL$NME$Q(
RPL$Q_TYP, OLD_FILE_ID, OLD_NIR_SUFFIX
, FILE_ID, NIR_SUFFIX )
VALUES (
'D', OLD.FILE_ID, OLD.NIR_SUFFIX
, NEW.FILE_ID, NEW.NIR_SUFFIX );
END
ALTER PROCEDURE RPL$NME$SEND_FULL
RETURNS ( NME_ID VARCHAR( 11 )
, NME_CODE VARCHAR( 4 )
, NME_TXT VARCHAR( 300 ) )
AS
DECLARE VARIABLE SEND_ITEM CHAR( 1 );
/* BEGIN USER DEFINED VARIABLES */
DECLARE VARIABLE tmpNIR_SUFFIX INTEGER;
/* END USER DEFINED VARIABLES */
BEGIN
SEND_ITEM = 'T';
/* BEGIN USER DEFINED VARIABLE INITIALIZATION */
tmpNIR_SUFFIX = NULL;
/* END USER DEFINED VARIABLE INITIALIZATION */
/* BEGIN USER DEFINED SOURCE */
FOR SELECT n.FILE_ID
, ( SELECT nt.NIR_CODE
FROM NIR_TYP nt
WHERE nt.NIR_SUFFIX = n.NIR_SUFFIX )
, n.NIR_NAME
FROM NIR n
WHERE n.NIR_STATUS = 'A'
ORDER BY n.FILE_ID, n.NIR_SUFFIX
INTO :NME_ID, :NME_CODE, :NME_TXT DO
BEGIN
SUSPEND;
END
/* END USER DEFINED SOURCE */
END
ALTER PROCEDURE RPL$NME$SEND_Q
RETURNS ( RPL$Q_KEY INTEGER
, RPL$Q_TYP CHAR( 1 )
, OLD_NME_ID VARCHAR( 11 )
, OLD_NME_CODE VARCHAR( 4 )
, NME_ID VARCHAR( 11 )
, NME_CODE VARCHAR( 4 )
, NME_TXT VARCHAR( 300 ) )
AS
DECLARE VARIABLE SEND_ITEM CHAR( 1 );
/* BEGIN USER DEFINED VARIABLES */
DECLARE VARIABLE tmpNIR_SUFFIX INTEGER;
/* END USER DEFINED VARIABLES */
BEGIN
SEND_ITEM = 'T';
/* BEGIN USER DEFINED VARIABLE INITIALIZATION */
tmpNIR_SUFFIX = NULL;
/* END USER DEFINED VARIABLE INITIALIZATION */
FOR SELECT q.RPL$Q_KEY, q.RPL$Q_TYP
FROM RPL$NME$Q q
ORDER BY q.RPL$Q_KEY
INTO :RPL$Q_KEY, :RPL$Q_TYP DO
BEGIN
/* BEGIN USER DEFINED SOURCE */
SELECT q.FILE_ID
, q.OLD_FILE_ID
, ( SELECT nt.NIR_CODE
FROM NIR_TYP nt
WHERE nt.NIR_SUFFIX = q.NIR_SUFFIX )
, ( SELECT nt.NIR_CODE
FROM NIR_TYP nt
WHERE nt.NIR_SUFFIX = q.OLD_NIR_SUFFIX )
, q.NIR_SUFFIX
FROM RPL$NME$Q q
WHERE q.RPL$Q_KEY = :RPL$Q_KEY
INTO :NME_ID, :OLD_NME_ID
, :NME_CODE, :OLD_NME_CODE
, :tmpNIR_SUFFIX;
SELECT n.NIR_NAME
FROM NIR n
WHERE n.FILE_ID = :NME_ID
AND n.NIR_SUFFIX = :tmpNIR_SUFFIX
INTO :NME_TXT;
/* END USER DEFINED SOURCE */
IF ( SEND_ITEM = 'T' ) THEN
SUSPEND;
ELSE
DELETE FROM RPL$NME$Q q
WHERE q.RPL$Q_KEY = :RPL$Q_KEY;
END
END
ALTER PROCEDURE RPL$AGENT_NAME$SEND_Q
RETURNS ( RPL$Q_KEY INTEGER
, RPL$Q_TYP CHAR( 1 )
, OLD_AGENT_ID INTEGER
, AGENT_ID INTEGER
, LASTNAME VARCHAR( 60 )
, FIRSTNAME VARCHAR( 60 )
, MIDDLENAME VARCHAR( 60 ) )
AS
DECLARE VARIABLE SEND_ITEM CHAR( 1 );
/* BEGIN USER DEFINED VARIABLES */
/* END USER DEFINED VARIABLES */
BEGIN
SEND_ITEM = 'T';
/* BEGIN USER DEFINED VARIABLE INITIALIZATION */
/* END USER DEFINED VARIABLE INITIALIZATION */
FOR SELECT q.RPL$Q_KEY,
q.RPL$Q_TYP,
q.OLD_AGENT_ID,
q.AGENT_ID
FROM RPL$AGENT_NAME$Q q
ORDER BY q.RPL$Q_KEY
INTO :RPL$Q_KEY,
:RPL$Q_TYP,
:OLD_AGENT_ID,
:AGENT_ID DO
BEGIN
/* BEGIN USER DEFINED SOURCE */
SELECT n.AGENT_ID, n.LASTNAME, n.FIRSTNAME, n.MIDDLENAME
FROM AGENT n
WHERE n.AGENT_ID = :AGENT_ID
INTO :AGENT_ID, :LASTNAME, :FIRSTNAME, :MIDDLENAME;
/* END USER DEFINED SOURCE */
IF ( SEND_ITEM = 'T' ) THEN
SUSPEND;
ELSE
DELETE FROM RPL$AGENT_NAME$Q q WHERE q.RPL$Q_KEY = :RPL$Q_KEY;
END
END
ALTER PROCEDURE RPL$AGENT_NAME$SEND_FULL
RETURNS ( AGENT_ID INTEGER
, LASTNAME VARCHAR( 60 )
, FIRSTNAME VARCHAR( 60 )
, MIDDLENAME VARCHAR( 60 ) )
AS
DECLARE VARIABLE SEND_ITEM CHAR( 1 );
/* BEGIN USER DEFINED VARIABLES */
/* END USER DEFINED VARIABLES */
BEGIN
SEND_ITEM = 'T';
/* BEGIN USER DEFINED VARIABLE INITIALIZATION */
/* END USER DEFINED VARIABLE INITIALIZATION */
/* BEGIN USER DEFINED SOURCE */
FOR SELECT n.AGENT_ID, n.LASTNAME, n.FIRSTNAME, n.MIDDLENAME
FROM AGENT n
WHERE (1=1)
ORDER BY n.AGENT_ID
INTO :AGENT_ID, :LASTNAME, :FIRSTNAME, :MIDDLENAME DO
BEGIN
SUSPEND;
END
/* END USER DEFINED SOURCE */
END
ALTER PROCEDURE RPL$AGENT$SEND_Q
RETURNS ( RPL$Q_KEY INTEGER
, RPL$Q_TYP CHAR( 1 )
, OLD_AGENT_ID INTEGER
, AGENT_ID INTEGER
, AGENT_NAME VARCHAR( 200 ) )
AS
DECLARE VARIABLE SEND_ITEM CHAR( 1 );
/* BEGIN USER DEFINED VARIABLES */
DECLARE VARIABLE tmpLASTNAME VARCHAR( 60 );
DECLARE VARIABLE tmpFIRSTNAME VARCHAR( 60 );
DECLARE VARIABLE tmpMIDDLENAME VARCHAR( 60 );
/* END USER DEFINED VARIABLES */
BEGIN
SEND_ITEM = 'T';
/* BEGIN USER DEFINED VARIABLE INITIALIZATION */
tmpLASTNAME = NULL;
tmpFIRSTNAME = NULL;
tmpMIDDLENAME = NULL;
/* END USER DEFINED VARIABLE INITIALIZATION */
FOR SELECT q.RPL$Q_KEY,
q.RPL$Q_TYP,
q.OLD_AGENT_ID,
q.AGENT_ID
FROM RPL$AGENT$Q q
ORDER BY q.RPL$Q_KEY
INTO :RPL$Q_KEY,
:RPL$Q_TYP,
:OLD_AGENT_ID,
:AGENT_ID DO
BEGIN
/* BEGIN USER DEFINED SOURCE */
SELECT n.LASTNAME, n.FIRSTNAME, n.MIDDLENAME
FROM AGENT n
WHERE n.AGENT_ID = :AGENT_ID
INTO :tmpLASTNAME, :tmpFIRSTNAME, :tmpMIDDLENAME;
AGENT_NAME = tmpLASTNAME || ', ' ||
tmpFIRSTNAME || ' ' ||
tmpMIDDLENAME;
/* END USER DEFINED SOURCE */
IF ( SEND_ITEM = 'T' ) THEN
SUSPEND;
ELSE
DELETE FROM RPL$AGENT$Q q WHERE q.RPL$Q_KEY = :RPL$Q_KEY;
END
END
ALTER PROCEDURE RPL$AGENT$SEND_FULL
RETURNS ( AGENT_ID INTEGER
, AGENT_NAME VARCHAR( 200 ) )
AS
DECLARE VARIABLE SEND_ITEM CHAR( 1 );
/* BEGIN USER DEFINED VARIABLES */
DECLARE VARIABLE tmpLASTNAME VARCHAR( 60 );
DECLARE VARIABLE tmpFIRSTNAME VARCHAR( 60 );
DECLARE VARIABLE tmpMIDDLENAME VARCHAR( 60 );
/* END USER DEFINED VARIABLES */
BEGIN
SEND_ITEM = 'T';
/* BEGIN USER DEFINED VARIABLE INITIALIZATION */
tmpLASTNAME = NULL;
tmpFIRSTNAME = NULL;
tmpMIDDLENAME = NULL;
/* END USER DEFINED VARIABLE INITIALIZATION */
/* BEGIN USER DEFINED SOURCE */
FOR SELECT n.AGENT_ID, n.LASTNAME, n.FIRSTNAME, n.MIDDLENAME
FROM AGENT n
ORDER BY n.AGENT_ID
INTO :AGENT_ID, :tmpLASTNAME, :tmpFIRSTNAME, :tmpMIDDLENAME DO
BEGIN
AGENT_NAME = tmpLASTNAME || ', ' ||
tmpFIRSTNAME || ' ' ||
tmpMIDDLENAME;
SUSPEND;
END
/* END USER DEFINED SOURCE */
END
To assist in the task of automating your replication service, the parameters and code blocks which are set up at configuration time become the content of macro tokens which you can use to make your procedure blocks more generic. The TIB_RPL_Base class contains a parser procedure (MacroSubstitute) for expanding the macros into the SQL templates used by this module to generate the configuration, metadata and replication streams.
Here is the declaration of the protected virtual method:
| procedure TIB_RPL_Base.MacroSubstitute( const ATextBlock: string;
|
| var ATextResult: string );
|
ATextBlock is the constant that is enclosed between the macro token markers, e.g. <<SRC_PRC_DEC_VAR>>. The var ATextResult will be a chunk of code, a declaration, a parameter or an empty string. Your MacroSubstitute procedure "knows" what transformations to do in order to pass back the var properly expanded to slot into the SQL template.
You are not locked into the templates and parser supplied by the replication classes. You can override the virtual MacroSubstitute method to use your own parsing rules and templates.
Since this macro language will continue to evolve, the following key to the macros is not definitive.
| <<DST_DEL_EXP>> | Expression that would follow 'WHERE' in a WHERE clause, setting the conditions for excluding the deletion of row in the target table if the corresponding source row has been deleted
|
| <<DST_CLS>> | Code defining columns that are to be created in the target table. Syntax is like the definition of columns in a CREATE TABLE statement, e.g. AGENT_ID SYS_PK NOT NULL, AGENT_NAME VARCHAR( 200 ) NOT NULL
|
| <<DST_CLS_DEC_VARS>> | Chunk of code containing declarations for any custom variables that your target-side procedures will use. Syntax is the same as in a stored procedure, e.g. DECLARE VARIABLE tmpNIR_SUFFIX INTEGER;
|
| <<DST_CLS_SET_NULL>> | Comma-separated list of columns which are to be set null by a procedure or DSQL command.
|
| <<DST_KEY_CLS>> | Comma-separated list of the target table's key column names.
|
| <<DST_SRC_CLS>> | Comma-separated list of columns that are to be read from the source table. Syntax is like the column list inside the brackets of ato the target table.
|
| <<DST_SRC_KEY_CLS>> | Comma-separated list of key columns that are to be duplicated from the source table to the target table.
|
| <<EXP>> | Marks the following block as an expression which is to be transformed in a particular way, dependent on the macro token in which it is embedded.
|
| <<FLD_NME>> | Name of current field (column), as a procedure iterates through a field list.
|
| <<PK_DST_TBL_NME>> | Name of a PRIMARY KEY constraint (to be) created in the target table. The constraint name will be prefixed with 'PK_'.
|
| <<SET_EXP_N>> | 'n.' as in 'n.ColumnName' (where 'n' is a table name alias)
|
| <<SRC_ADD_EXP>> | Expression that would follow 'WHERE' in a WHERE clause, setting the conditions for including a row in the target table, e.g. STATUS = 'A'
|
| <<SRC_KEY_CLS>> | Comma-separated list of the source table's key column names
|
| <<SRC_PRC_DEC_VAR>> | Chunk of code containing declarations for any custom variables that your source-side procedure will use in constructing the SQL stream for the queue and/or full replication. Syntax is the same as in a stored procedure, e.g. DECLARE VARIABLE tmpNIR_SUFFIX INTEGER;
|
| <<SRC_PRC_SRC_FULL> | A procedure chunk to supply the parameter values from the source table for the SQL stream that will be used for a full replication across to the target.
|
| <<SRC_PRC_SRC_Q>> | A procedure chunk to supply the values from the queue table on the source side for the SQL stream that will be used to replicate the queue across to the target.
|
| <<SRC_PRC_VAR_INIT>> | Chunk of code containing initializations for the variables declared above, e.g tmpNIR_SUFFIX = NULL;
|
| <<SRC_UPD_EXP>> | Expression that would follow 'WHERE' in a WHERE clause, setting the conditions for including a source row's changes in the replication queue, e.g. OLD.Description <> NEW.Description
|
| <<UK_DST_TBL_NME>> | Name of a UNIQUE constraint (to be) created in the target table, The constraint name will be prefixed with 'UK_'.
|
Include capability to replicate ARRAY columns
Currently, I can't find a way to replicate ARRAY columns. I am continuing to explore this one.
Improve automation of index maintenance
It seems as though we may need to build a pooling mechanism so that an array of 10 TIB_RPL_Sync components can service the maintenance of a hundred or so RPL indexes. I think it would be way too much overhead to have a prepared RPL index for every table you have being replicated. I think I could have one IB_RPL_Sync component handle up to 8 RPL indexes because it uses an event alerter inside it and it will allow up to 16 event registrations. Since I have two events for each one 8 would be the maximum it could hold.
Using the TIB_RPL_Meta component it should be possible to automate the process of batching up multiple RPL index definitions. You would insert data directly into the RPL$_IND table. Then, using a TIB_RPL_Meta component, to walk each entry in the RPL$_IND table and move it to the next level, until they are all activated.
It could be a separate tool that would allow people to pick tables, line up columns, etc. Most of the hard work would be handled by the TIB_RPL_Meta components' extensive macro processing capabilities.
Jason L. Wharton
CPS, Mesa, AZ
Copyright 2001
|
|
|
